

Matt Junker - Ongoing Services Manager
Are you new to the ArcGIS Pro Parcel Fabric and want to map subdivisions? Find your bearings here with these 5 easy steps.
1. Review Subdivision Plat and Legal Description

Before you jump into your Parcel Fabric and start editing your Land Records, you will want to read and review the subdivision plat. The plat is the legal record filed with the jurisdictional authority (County Recorder of Deeds, etc.) and is the basis for surveying and mapping a property. It contains a map of the property to be subdivided as well as a legal description that contains your “game plan” for mapping the subdivision. Key terms to look for are point of beginning, references to fractional components (¼, etc), section, township, and range; and the characteristics of a curve (to the right or left).
Whether you use the map on the subdivision plat or legal description as your source for mapping the subdivision, you will find your bearings (direction and distance) in either section.
2. Create a Record for the Subdivision
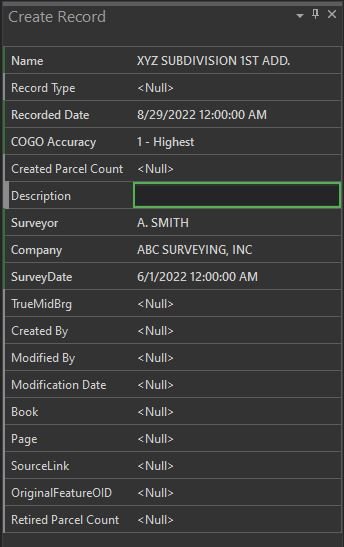
Before you start mapping lots and parcels in the ArcGIS Pro Parcel Fabric, you must be working in an active parcel fabric record. The record is a feature class that is associated with a legal record such as a subdivision plat, deed, or survey. Use the Create Records operation to add a record for the subdivision, and set it as the Active Record.
Enter information from the subdivision plat into the Record attributes, such as Name, Description, Recorded Date, Surveyor/Survey Company, and Survey Date.
3. Create the Subdivision Parcel
With an Active Record, you are ready to map the subdivision parcel. One way to accomplish this is to use the Traverse tool, located in the Tools gallery of the Records tab in ArcGIS Pro. Using the information from the subdivision plat, start the traverse at the point of beginning (and make sure you have chosen the correct layer in which to draw your lines), and enter the direction and distance of lines or the arc length and radii of curves as described in the plat until the traverse is complete. With these lines selected, you can Create Parcel Seeds and Build the subdivision polygon.
4. Create Lots and Tax Parcels
Now it is time to dig into the interior of the subdivision and map the lots and parcels. One piece of advice that was passed on to me is to map the road right-of-way line segments and curves first. Once the right-of-way lines have been mapped, you can begin to place vertices and lot lines based on information from the plat by using the Divide tool and Traverse or Two Point Line tool within Create Features. Make sure you are working in the Lot (Conveyance Division) Lines layer. Once the lot lines have been mapped, they can be made into polygons using the Create Seeds and Build Active tools. Repeat the process to add parcel lines and parcel polygons.
NOTE: If the Create Seeds tool fails (it sometimes does), you can add Parcel Seeds by going to the polygon layer for the Parcel Type in Create Features, and choosing to add a Seed manually to the map.
5. Attributes and Labeling

The last step in mapping subdivisions is entering attributes and labeling features on the map. Attributes such as name or Lot Type could be entered manually in the Attributes pane, but there is also a Sequential Numbering tool that makes the process easy and painless for adding Lot numbers in a subdivision.
Other labels on your map, such as the direction and distance of lines or arc length and radius of a curve, are COGO enabled attributes that are stored as attributes in the line layer of a particular parcel type. These labels are set up in a layer’s Labeling Properties, with Esri’s expression language Arcade providing the ability to style your map labels effectively, as simple or complex as you desire.
For more tips and walkthroughs, check out our previous Land Records webinars on our YouTube Channel HERE
- - -